Go retro with a super-low-tech digital camera trick.
Get published, get famous! Each week, we select our favorite reader-submitted photo based on creativity, originality, and technique. Every month, the best of the weekly winners gets a prize valued at between $15 and $50.
Here's how to enter: Send us your photograph in JPEG format, at a resolution no higher than 640 by 480 pixels. Entries at higher resolutions will be immediately disqualified. If necessary, use an image editing program to reduce the file size of your image before e-mailing it to us. Include the title of your photo along with a short description and how you photographed it. Don't forget to send your name, e-mail address, and postal address. Before entering, please read the full description of the contest rules and regulations.

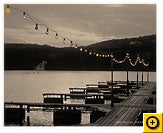
David says: "I took this photograph near a popular Austin restaurant with my Konica Hexar RF rangefinder camera. I was struck by the row of multicolor light bulbs, the water, and the setting sun in the distance.
"I scanned the transparency using a Nikon 5000 scanner and then edited it in Photoshop CS2. I converted a layer to monochrome and tinted it slightly using a warming filter. Then I used the history brush to recover the colored light bulbs.
"The whole idea of this particular image unfolded as I worked with it. The original full color image was pretty, but the idea of something more vintage while retaining the color of the bulbs came to me gradually as I worked on it."
Starting with the May Hot Pic of the Month, I've decided to let you pick the winner--after all, why should I have all the fun?
The poll is now open. From now till Sunday, June 3, you can view a slide show of our five Hot Pic winners for May. After you check out the contestants, click the "Vote for This Entry" link on any of the pages to cast your vote. I'll announce the winner in my June 5 newsletter.
At the risk of dating myself, I feel compelled to say that when I was a kid, I did all the things budding geeks were supposed to do. For example, I made a crystal radio (a simple radio that doesn't need a battery) and a pinhole camera. A pinhole camera is perhaps the simplest kind of photographic device, because it uses no lens. A tiny pinhole in a well-sealed cardboard box is all you need to capture an image on film.
You can experience some of this excitement by making your own lens-free digital camera. For the best results, you need a digital SLR (so you can remove the lens), a body cap (the cover that screws onto the camera body when there's no lens attached), some heavy foil, and electrical tape. Ready to play along?
To begin with, you'll need to make a hole in the camera's body cap. I don't suggest poking a hole in your only cap, so stop into your local camera shop and get a spare or two. They cost about $3 each, and it's always handy to have an extra in case you need to remove the lens for more than few moments.
The size of the hole isn't especially important. I drilled a 5/32-inch hole in the center of the cap using an ordinary household drill--after removing the body cap from the camera first, of course.
Next, you need to make a smaller hole in some heavy foil--this is the real pinhole. A foil pie tin works great for this. Cut a small circle out of the tin that will fit inside the back of the body cap and then use a thin, sharp pin to make a tiny hole in the metal.
When you're done, use some electrical tape to position the pie tin on the body cap so the two holes line up, with the small hole in the center of the circle.
Now remove the lens from your camera and screw on the body cap. You've just made a pinhole camera: Instead of expensive, multi-element, precision optics, your camera now works on the low-tech principle that an extremely small hole will cause a relatively sharp image to resolve on the sensor.
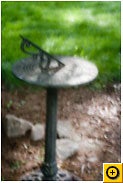
 From here it's all about experimenting. You'll almost certainly want to use a tripod, because you'll need long shutter speeds. Set your camera to its manual exposure mode and start with a 1-second exposure. Check your results and go up from there; I found a 15-second exposure was good outdoors at midday for my particular pinhole, like this sun dial snapshot.
Why do this? Well, it's fun, and it's a completely unexpected way to use your digital camera.
In addition, your pinhole camera is a good prop to use for teaching kids about the basic physics of photography. Try making several foil body cap inserts with different-sized holes. You can demonstrate how the smaller the hole, the sharper the image--but also the darker the preview, and the longer the necessary exposure. An infinitely small hole would give you perfectly focused results, but the exposure time would be lengthy, since only one photon of light could get through to the sensor at a time.
If you have a point-and-shoot camera with a removable lens cap, you can still try this experiment. The results won't be as authentic because you can't remove your lens, and the resulting photos will always be somewhat blurry. You'll need to drill the hole in a spare lens cap. When you take the pictures, set your lens to the longest telephoto setting available, then use your camera's manual focus mode to focus on infinity for the most authentic pinhole effect.